This window allows you to make issue types available for particular IPK Statuses, so that when Analysts log a call, only the issue types linked to the status are available for selection.
Organization A wants to allow Analysts to choose a particular type, such as Fault, for all IPK Statuses except Service Requests, since these are not used for faults. By limiting the Fault type to all statuses except Service Request, when an Analyst logs a Service Request, they will not see ‘Fault’ in the Type Q/D field.
Types on lower tiers take the limits set for their parent type, unless a specific limit is set for them.
Making a Type Available for an IPK Status
Before you start
You must have IPK Setup selected in the Admin tab of your General Access Security Role.
Limit Type by IPK Status must be selected on the IPK Settings window.
-
Select the Menu button
 , then Admin, and then select System Administration. The System Administration window is displayed, with a menu of options available
  . In the Explorer pane, locate the IPK Management group
  , scrolling up or down if necessary. You may need to expand the group to see the options.
 - Select Limit Type by IPK Status to open the window. A browse table is displayed showing types that are currently limited by IPK status
 . (You may like to adjust the column widths to see all of the columns.)
 - In the Type field, select
 and then select the type you require. You can limit types from a lower type tier by navigating to it from this drop-down selector.
 - Select
 . The type will be added as a new row.
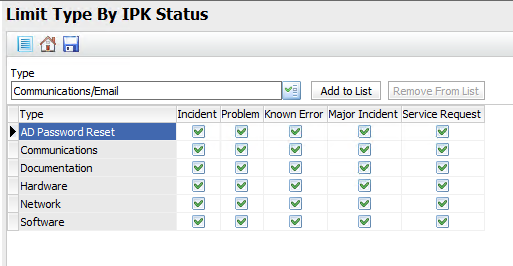
- Select the checkbox for each status (such as Incident, Problem, Known Error) you want to associate with this type. (You may like to adjust the column widths to see all of the columns.)
-
To make all Types available for all IPK Statuses select the check box for every IPK Status
- Select
 to save the changes. Provide the Change Reasons if prompted to do so.
Making a Type Unavailable to an IPK Status
You can prevent certain Types from available in the Call Details of specific IPK Statuses and theLink Stream/Type/Status to Call Screen Set window by deselecting the link in the Limit Type by IPK Status window.
Before you start
You must have IPK Setup selected in the Admin tab of your General Access Security Role.
Limit Type by IPK Status must be selected on the IPK Settings window.
-
Select the Menu button
, then Admin, and then select System Administration. The System Administration window is displayed, with a menu of options available . In the Explorer pane, locate the IPK Management group , scrolling up or down if necessary. You may need to expand the group to see the options. - Select Limit Type by IPK Status to open the window. A browse table is displayed showing types that are currently limited by IPK status . (You may like to adjust the column widths to see all of the columns.)
- Deselect the checkbox for each status (such as Incident, Problem, Known Error) you want to make unavailable for this type. (You may like to adjust the column widths to see all of the columns.)
- Select to save the changes. Provide the Change Reasons if prompted to do so.
Deleting a Link between a Lower Type Tier and an IPK Status
You can remove limitations between lower Type tiers and IPK statuses, if those lower Type tiers were added to the matrix. Lower Type tiers inherit the configuration of their parent Type.
Before you start
You must have IPK Setup selected in the Admin tab of your General Access Security Role.
Limit Type by IPK Status must be selected on the IPK Settings window.
-
Select the Menu button
, then Admin, and then select System Administration. The System Administration window is displayed, with a menu of options available . In the Explorer pane, locate the IPK Management group , scrolling up or down if necessary. You may need to expand the group to see the options. - Select Limit Type by IPK Status to open the window.
- In the browse table, select the row you want to delete.
- Select
 .
. - In the warning dialog box, select Yes or No. If there are lower level type tiers for the selected type, the message will alert you about this.
- Select
 to delete the selected link, as well as any lower level tiers if added.
 - Select
 to close the message window without deleting the link.
 - Select to save the changes. Provide the Change Reasons if prompted to do so.
This button is disabled for first tier types.