Message Types
You can list all the email, pager (text) and internal message types provided in vFire Core, and link templates to message types. The name of the message or pager type indicates the entity to which it relates, such as agreement, and the scenario in which it is used.
Say, for example, Message Type 1003 is called Call – Note Added. This message type would be used to send an email when a note is added to a call.
Viewing Message Types
Before you start
You must have System Set Up selected in the Admin tab of your General Access security role.
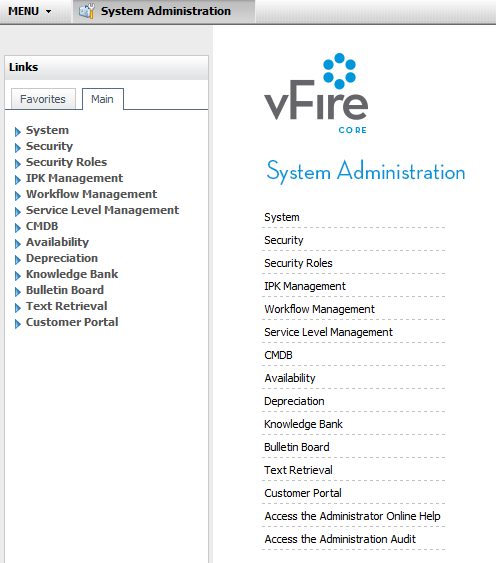
- Select the Menu button
 , then Admin, and then select System Administration. The System Administration window is displayed
  . In the Explorer pane, locate the System group
  , scrolling up or down if necessary. You may need to expand the group to see the options within it.
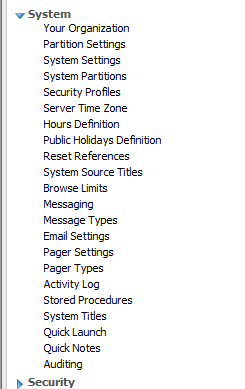
 - Select the Message Types option. The Message Types window appears.
 It contains a table with two columns:

| Code | A number assigned to the message type |
| Name | The title of the message type. This indicates the entity the message relates to and the scenario in which it is used |
Viewing Message Type Templates
Before you start
You must have System Set Up selected in the Admin tab of your General Access security role.
Each message or pager type is linked to a template, which is the file used to generate a message. The template is associated with a predefined query. Templates can be created and configured in the Designer.
- View the list of message types.
- Select the required message type, scrolling down if necessary.
- Double click on the entry, or select
 . The Message Type Map window is displayed, showing the following details, which are read-only and cannot be modified.
- Two additional options are shown:
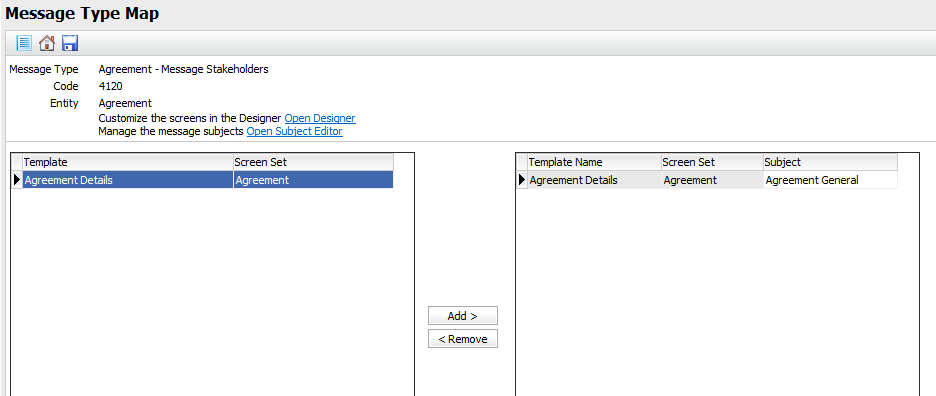
| Message Type | Name of the message type |
| Code | The number (identifier) assigned to the template |
| Entity | The name of the table for the entity on which the selected message type is based |
| Open Designer | You would select this option to modify the selected template in the Designer. This option is only enabled if your security role permits you to access the Designer. |
| Open Subject Editor | You would select this option to manage the message subjects. Save any changes made on the Message Type Map window before selecting this option. |
Below these fields, two browse tables are displayed. The left one lists all the templates in the system that can be selected for this message type. The right displays the template(s) linked to the selected message type, as well as the screen set(s) and the subject(s). vFire Core provides a default template for emails. New templates can be created using the Designer.
Linking Templates to a Message Type
Before you start
There must be at least one message template assigned to the default screen set for the entity. If email templates are partitioned, there must be at least one message template for the default screen set and the default partition.
Additional templates may not be used except in some cases. Additional linked templates are available for selection only on selected windows where Analysts can select a template, for example, the Send Email window of a call or request.
For emails that are sent automatically by the system, you cannot link more than one template to the same screen set. If email templates are partitioned, you cannot link more than one template to the same screen set and the same partition.
You must have System Set Up selected in the Admin tab of your General Access security role.
-
 Display the Message Type Map window, if it is not already on screen.
- Select the Menu button , then Admin, and then select System Administration. The System Administration window is displayed . In the Explorer pane, locate the System group , scrolling up or down if necessary. You may need to expand the group to see the options within it.
- Select the Message Types option.
- In the browse table, select the required message type, scrolling down if necessary. Double click on the entry, or use the button on the toolbar to display the Message Type Map window.
- Select the Menu button
- Select the template from the Template table on the left.
- Select
 to link the template to the selected message type. It appears in the right hand table.
 - If you have a partitioned system, assign the partition. Select the Partition cell for the template. This will display a drop-down list with all the partitions to which you have access. Select the partition you want to assign to the message template.
-
You only need assign partitions to message templates that are specifically designed for that partition. When the system tries to send an email that does not have a message template assigned to the partition of the entity, it will use the topmost message template displayed in the Default partition.
- Amend the Subject, if you wish. Select the existing subject to see the small arrow indicating a drop down list of subjects linked to the screen set. You can update the subjects using the Subject Editor.
- Select
 to save the changes. Provide the Change Reasons if prompted to do so.
Customizing Message Templates
Before you start
You must have System Set Up and Designer selected in the Admin tab of your General Access security role.
You cannot modify pager templates.
-
Display the Message Type Map window, if it is not already on screen.
- Select the Menu button , then Admin, and then select System Administration. The System Administration window is displayed . In the Explorer pane, locate the System group , scrolling up or down if necessary. You may need to expand the group to see the options within it.
- Select the Message Types option.
- In the browse table, select the required message type, scrolling down if necessary. Double click on the entry, or select to display the Message Type Map window.
- Select the Menu button
- Select the template from the Template table.
- Select Open Designer. The Designer window opens with the associated entity, such as Call, selected in the left hand pane and the list of screens on the right filtered to display only message templates.
- Customize the template using the features of the Designer.
- Return to the Message Type Map window. Select to save the changes. Provide the Change Reasons if prompted to do so.
Message Subjects
You can define the subject for a message and include fields from the selected entity type for a particular screen set to use in the subject. You can define a default subject as well as a particular subject for each screen set associated with the current message type.
Creating a Message Subject
Before you start
You must have System Set Up and Designer selected in the Admin tab of your General Access security role.
-
Display the Message Type Map window, if it is not already on screen.
- Select the Menu button , then Admin, and then select System Administration. The System Administration window is displayed . In the Explorer pane, locate the System group , scrolling up or down if necessary. You may need to expand the group to see the options within it.
- Select the Message Types option.
- In the browse table, select the required message type, scrolling down if necessary. Double click on the entry, or select to display the Message Type Map window.
- Select the Menu button
- Select Open Subject Editor. The Message Subjects window appears.

- Select
 .
. - Configure the Message Subject Details:
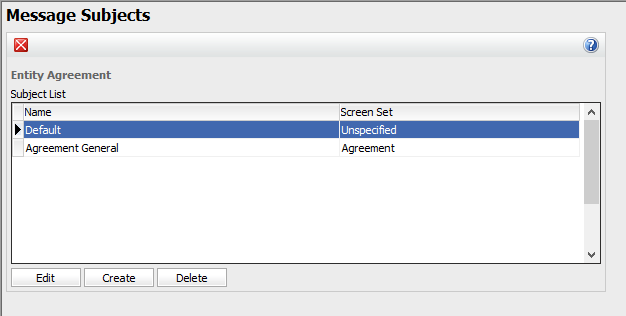
| Name | The name for the subject |
| Screen Set | Select the screen set from the drop down list. Only the screen sets associated with the entity linked to the selected message type are displayed. |
| Data fields for | Select the data field for the message from the drop down list. This determines the data fields displayed in the browse table. |
| Display Title | Select the display title from the list provided, scrolling down if necessary |
| Subject | Key in the text that you want to appear in the subject line of the email template. You can also drag and drop data fields from the left hand list into this field if needed. |
- Select
 . A new row with the details of the subject is added to the list of subjects in the Message Subjects window.
 - Select
 to return to the Message Types window.
 - Link the new subject to the new template using the Subject drop down if necessary.
- Save the details.
Subjects are specific to the screen set for which they were created. This is in consideration that fields may not be available on a different screen set. The only exception is the Base Entity screen set, such as Base Task Screen Set, Call Screen Set, etc. Subjects created using these 'base' screen sets can be mapped to message temples of any screen set.
Editing a Message Subject
Before you start
You must have System Set Up and Designer selected in the Admin tab of your General Access security role.
-
Display the Message Type Map window, if it is not already on screen.
- Select the Menu button , then Admin, and then select System Administration. The System Administration window is displayed . In the Explorer pane, locate the System group , scrolling up or down if necessary. You may need to expand the group to see the options within it.
- Select the Message Types option.
- In the browse table, select the required message type, scrolling down if necessary. Double click on the entry, or use the button on the toolbar to display the Message Type Map window.
- Select the Menu button
- Select Open Subject Editor. The Message Subjects window appears.
- From the Subject List browse table, select the message subject you wish to modify.
- Select
 .
. - In the Message Subjects box, configure the Message Subject Details:
- Select to save the changes or
 to return without saving.
 - Select to return to the Message Type Map window.
- Link the subject to the template if necessary.
| Name | The name for the subject |
| Screen Set | Select the screen set from the drop down list. Only the screen sets associated with the entity linked to the selected message type are displayed. |
| Data fields for | Select the data field for the message from the drop down list. This determines the data fields displayed in the browse table. |
| Display Title | Select the display title from the list provided, scrolling down if necessary |
| Subject | Key in the text that you want to appear in the subject line of the email template. You can also drag and drop data fields from the left hand list into this field if needed. |
Deleting a Message Subject
Before you start
You must have System Set Up and Designer selected in the Admin tab of your General Access security role.
-
Display the Message Type Map window, if it is not already on screen.
- Select the Menu button , then Admin, and then select System Administration. The System Administration window is displayed . In the Explorer pane, locate the System group , scrolling up or down if necessary. You may need to expand the group to see the options within it.
- Select the Message Types option.
- In the browse table, select the required message type, scrolling down if necessary. Double click on the entry, or use the button on the toolbar to display the Message Type Map window.
- Select the Menu button
- Select Open Subject Editor. The Message Subjects window appears.
- From the browse table, select the message subject you wish to delete.
- Select
 . A pop-up window asking you to confirm the deletion will appear. Select
  to confirm the changes and
  to exit the window without saving.
 - Select to return to the Message Type Map window.
The subject will no longer be available in the drop down list on the Message Type Map window.
Unlinking Templates
Before you start
You must have System Set Up selected in the Admin tab of your General Access security role.
At least one template must be linked to a message type.
-
Display the Message Type Map window, if it is not already on screen.
- Select the Menu button , then Admin, and then select System Administration. The System Administration window is displayed . In the Explorer pane, locate the System group , scrolling up or down if necessary. You may need to expand the group to see the options within it.
- Select the Message Types option.
- In the browse table, select the required message type, scrolling down if necessary. Double click on the entry, or use the button on the toolbar to display the Message Type Map window.
- Select the Menu button
- Select the template from the table on the right.
- Select
 to remove it from the list.
 - Select to save the changes. Provide the Change Reasons if prompted to do so.